Initially, Microsoft Excel was developed to process large data arrays. However, it also created accounting records like invoices, evaluations, or balance sheets quickly and effectively.
In more or fewer payment documents, it is necessary to duplicate numeric values with their word form. Excel doesn’t have a default function that displays numbers as English words in a worksheet. Still, you can add this capability by pasting the following SpellNumber function code into a VBA (Visual Basic for Applications) module. This function lets you convert dollar and cent amount to words with a formula.
For example, 25.50 would read as Twenty Five Dollars and Fifty Cents. This can be very useful if you’re using Excel as a template to print checks. So what you need is not just convert numbers to words in Excel (123.45 to one hundred and twenty three, forty five), but spell out dollars and cents ($29.95 to twenty nine dollars and ninety nine cents), pounds and pence for GBP, Euros, and Eurocents for EUR, etc.
If you want to convert numeric values to text format without displaying them as words, use the TEXT function as an alternative.
Even Excel 2016 doesn’t have a built-in tool for spelling numbers, not to mention earlier versions. But that is when Excel is really good. You can always improve its functionality using formulas in all their combinations, VBA macros, or third-party add-ins.

If you are looking for the number to text conversion, which means you want Excel to see your number as text, it’s a bit different. Usually, you need to change the cell format in Excel, do the following things:
- Select your range with numbers.
- Press Ctrl+1on the Number tab and select “Text” in the Category
How to Convert Numbers to Words Using SpellNumber VBA Macro
Microsoft didn’t want to add a tool for the number to words conversion. But they created and published the special VBA macro on their website.
You can find the macro mentioned as “spellnumber formula“. However, it is not a formula but a macro function or an Excel User-defined function (UDF).
The SpellNumber option can write dollars and cents. If you need a different currency, you can change “dollar” and “cent” with your choice. Below you will find a VBA code and follow the following steps, such as:
Step 1: Open the workbook where you need to spell the numbers into words.
Step 2: Press Alt + F11 to open the Visual Basic Editor window.
If you have several books opened, check that the needed workbook is active using the list of projects in the upper left corner of the editor, or one of the workbook elements is highlighted with blue.
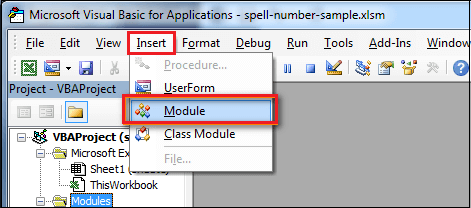
Step 3: In the editor menu, go to the Insert tab and click on the Module button.

Step 4: You will see a window named Module1. Please select all of the code in the frame below and paste it to this window.
- Option Explicit
- ‘Main Function
- Function SpellNumber(ByVal MyNumber)
- Dim Dollars, Cents, Temp
- Dim DecimalPlace, Count
- ReDim Place(9) As String
- Place(2) = ” Thousand ”
- Place(3) = ” Million ”
- Place(4) = ” Billion ”
- Place(5) = ” Trillion ”
- MyNumber = Trim(Str(MyNumber))
- DecimalPlace = InStr(MyNumber, “.”)
- If DecimalPlace > 0 Then
- Cents = GetTens(Left(Mid(MyNumber, DecimalPlace + 1) & _
- “00”, 2))
- MyNumber = Trim(Left(MyNumber, DecimalPlace – 1))
- End If
- Count = 1
- Do While MyNumber <> “”
- Temp = GetHundreds(Right(MyNumber, 3))
- If Temp <> “” Then Dollars = Temp & Place(Count) & Dollars
- If Len(MyNumber) > 3 Then
- MyNumber = Left(MyNumber, Len(MyNumber) – 3)
- Else
- MyNumber = “”
- End If
- Count = Count + 1
- Loop
- Select Case Dollars
- Case “”
- Dollars = “No Dollars”
- Case “One”
- Dollars = “One Dollar”
- Case Else
- Dollars = Dollars & ” Dollars”
- End Select
- Select Case Cents
- Case “”
- Cents = ” and No Cents”
- Case “One”
- Cents = ” and One Cent”
- Case Else
- Cents = ” and ” & Cents & ” Cents”
- End Select
- SpellNumber = Dollars & Cents
- End Function
- Function GetHundreds(ByVal MyNumber)
- Dim Result As String
- If Val(MyNumber) = 0 Then Exit Function
- MyNumber = Right(“000” & MyNumber, 3)
- ‘ Convert the hundreds place.
- If Mid(MyNumber, 1, 1) <> “0” Then
- Result = GetDigit(Mid(MyNumber, 1, 1)) & ” Hundred ”
- End If
- ‘ Convert the tens and one’s place.
- If Mid(MyNumber, 2, 1) <> “0” Then
- Result = Result & GetTens(Mid(MyNumber, 2))
- Else
- Result = Result & GetDigit(Mid(MyNumber, 3))
- End If
- GetHundreds = Result
- End Function
- Function GetTens(TensText)
- Dim Result As String
- Result = “” ‘ Null out the temporary function value.
- If Val(Left(TensText, 1)) = 1 Then ‘ If value between 10-19…
- Select Case Val(TensText)
- Case 10: Result = “Ten”
- Case 11: Result = “Eleven”
- Case 12: Result = “Twelve”
- Case 13: Result = “Thirteen”
- Case 14: Result = “Fourteen”
- Case 15: Result = “Fifteen”
- Case 16: Result = “Sixteen”
- Case 17: Result = “Seventeen”
- Case 18: Result = “Eighteen”
- Case 19: Result = “Nineteen”
- Case Else
- End Select
- Else ‘ If value between 20-99…
- Select Case Val(Left(TensText, 1))
- Case 2: Result = “Twenty ”
- Case 3: Result = “Thirty ”
- Case 4: Result = “Forty ”
- Case 5: Result = “Fifty ”
- Case 6: Result = “Sixty ”
- Case 7: Result = “Seventy ”
- Case 8: Result = “Eighty ”
- Case 9: Result = “Ninety ”
- Case Else
- End Select
- Result = Result & GetDigit _
- (Right(TensText, 1)) ‘ Retrieve ones place.
- End If
- GetTens = Result
- End Function
- Function GetDigit(Digit)
- Select Case Val(Digit)
- Case 1: GetDigit = “One”
- Case 2: GetDigit = “Two”
- Case 3: GetDigit = “Three”
- Case 4: GetDigit = “Four”
- Case 5: GetDigit = “Five”
- Case 6: GetDigit = “Six”
- Case 7: GetDigit = “Seven”
- Case 8: GetDigit = “Eight”
- Case 9: GetDigit = “Nine”
- Case Else: GetDigit = “”
- End Select
- End Function
Step 5: Press Ctrl + S to save the updated worksheet.
You will need to resave your workbook. When you try to save the workbook with a macro, you’ll get the message, “The following features cannot be saved in macro-free workbook“.

Step 6: A VB project dialog box appears. Click on the No button.
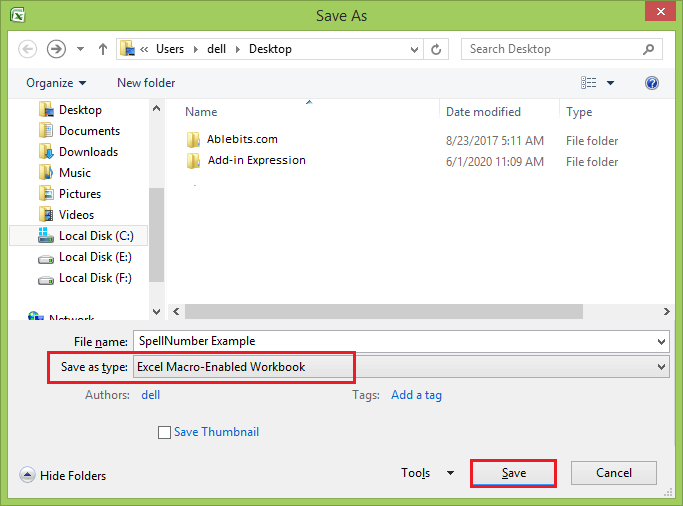
Step 7: You can save your file as an Excel Macro-Enabled Workbook (.xlsm) to keep your file in its current format.
- Click on the File tab.
- Select the Save As option.
- Click the Save as typedrop-down menu.
- And in the save as type field, choose the “Excel macro-enabled workbook” file type.

Step 8: And click on the Save button to save the file.
Disadvantages of Using Macro to SpellNumber in Excel
- First, you must know VBA to modify the code according to your needs. It is necessary to paste the code for each workbook where you plan to change it. Otherwise, you will need to create a template file with macros and configure Excel to load this file at each start.
- The main disadvantage of using a macro is if you send the workbook to somebody else, this person will not see the text unless the macro is built into the workbook. And even if it’s built-in, they will get an alert that there are macros in the workbook.
